


Check out this fabulous site created by Michael (Spectrum) that covers complete restoration projects on his '77 Ramada and his brother's '74 Roamer. Pictures and descriptions are broken down by subject and there's even a nice "Ramada Tour" covering the solid-state production years. Thanks for this wonderful resource Michael!!!
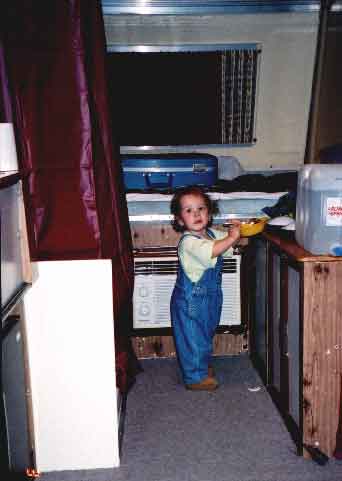
Here are a few pictures of a '69 Ramada that I have been
working on all Summer. My Aunt and Uncle gave it to me for free, and it had been
sitting in the woods for the last 6 years, needless to say it needed alot of
work. I just got a new canvas top from Canvas Replacements, Inc. for $825. It
was a little pricey, but the quality of the top is excellent. I am currently
finishing the interior and installing a new mini fridge. I also installed a city
water receptacle, water storage tank, water filter and faucet to have a water
hookup when I camp. In the interior, I laid new hunter green carpet for the
flooring. My aunt helped re-upholster the beds and couch cushions using hunter
green bed sheets that where sewn to custom fit each cushion: I think she called
them duvets. I installed a city water inlet and water tank with an in-line water
filter and a line splitter. Flip the one valve and it fills the reservoir tank,
flip the other valve and it pumps to a three
way pump that I got from camping world. It can either pump water from the
reservoir or run water directly from the tap. The interior was painted white to
cover over the funky 60's wood grain, and a new, small dorm fridge was installed
where the yellow monster once stood. All and all, it is a pretty nice camper,
especially with the new top. Steve
Total Remodel
I don't watch or post too often, but I couldn't resist telling all of you, of
our experience. About 3 years ago...I totally remodeled our camper...
I have a '75 Eagle 800, and I did a very simple paint job. First I scuff
sanded with 3M scratch pads, then I went to Menards, and bought paint
specifically designed for Aluminum siding (Lucite brand I believe), and applied
it with a smooth roller, and believe me, it is beautiful ! I did
bondo a couple of tiny tiny dent's first, and what's great about the roller, is
, it put on a really nice textured finish that hides everything....
We painted it the same cream color as the front/back and top, it's not original,
but it looks just as good as our neighbors with their $3-5K+ newer ones !
We also rebuilt the interior, by completely gutting it, and building all new
3/4" plywood benches w/storage (5'long), and a new pedestal table that
makes into a Queen-size bed in the middle (plus our 2 outer doubles), and a flip
over Kitchen unit, that used the original stove, a removable Coleman cooler for
the fridge, and the original stovetop & Sink, added an RV water pump for
sink instead of manual pump, large 24x24x24 storage unit. We started with
painting the entire interior in that granite speckled paint (blue w/white
specks), then replaced the tile floor with a one piece glue down, and bolted in
the plywood parts with angled brackets, as each one was painted to match. Also
we made our own seat covers and new draperies (with tape from Apache Sales), and
made a new table top of 3/4ply with laminate and new Kitchen counter. And with
speckled interior paint, you get a scuff or mar, just spray over it, all gone!
Entire project time (4 weekends), Cost $600 + (Original $450 we paid for it),
results: 1975 frame, 1999 Brand New Camper!
About a year later we also had to replace the original tiny gear crank up
units with big tooth ones, but in three years, it still looks brand new !
John & Colleen Martoccio - Fox Lake, IL
'71 Apache Ramada
We bought our camper two years ago and it was the best thing we ever spent our
money on. When we got the camper it was still 1971 green and we didn't like the
color behind our blue van. So we went to the car parts store and bought auto
paint and painted the camper blue. The paint is holding up great. On the inside
we bought regular spray paint , taped off anything we didn't want painted, and
made the inside white. We changed the ceiling panels to foam board, it was
pink so we took white paint and made the ceiling white also. It really
brightened up the inside. We changed the plastic cabinet doors to wood instead
of the plastic doors. All of the cushions were in the camper and in good shape
so I just recovered them to match the camper. I found material that has Apache
Indians on it and was blue, also made new curtains to match the cushions. Made
all the difference in the appearance of the whole camper.
When I made the new curtains I used Velcro to hold them up to the windows 'cause
those clips are more of a pain than they are worth. You have to make sure you
sew the Velcro to the material, and put a little superglue on the piece you put
above the window. Our table was a little wobbly so we put eye bolts in the bed
rail and
turnbuckles with hooks on the bottom of the table and then you can draw the
table down and it won't move anymore.
We are from Ohio and go everywhere with our camper, took it to South Carolina
for a week last year and had no problems with the camper. I don't understand why
they quit making the Apaches - they are the greatest campers out there, made to
last. - Mark & Paula
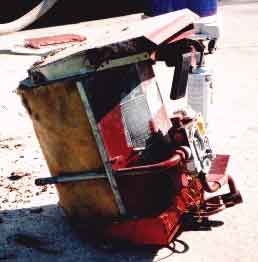
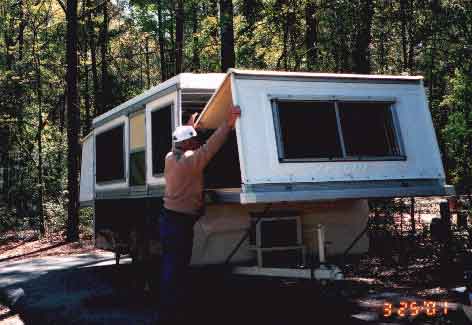
'72 Apache Restoration

Here is a picture of the front of the Apache disassembled to allow access to the chain. A small piece from one chain end had broken off and was jamming things up. (Elmer had the replacement part I needed!), I could not discover it until I had totally taken apart the extrusion. Which is not as bad a job as it looks.
First the bed drawer is removed by taking two screws out of each of the two nylon sliders, then the drawer is simply pulled out and set aside. (takes two people).
Then a few rivets are removed from the aluminum cap which is just below it. That will then allow you to remove the plastic front cover that the spare tire has been removed from. The plastic front cover is simply lifted up and out of it's channel, it is not otherwise attached. (this also allows access to all the trailer wiring and importantly, the running lights.
Then about 10 rivets need to removed from the front half of the extrusions, and it then can be slid forward from the back half. Now you can see all that there is to see in there, very little. But there was a lot of crud built up on the surfaces that I cleaned up too, and now with the new gear boxes the top cranks up very easy.

Here is another view of the chains with the extrusion taken apart.

Here is a picture of a common problem, cracks and broken ABS panels near high stress areas. This is also surprisingly easy to repair. I used lightweight fiberglass cloth in areas that would show, and PVC pipe cement, or the recommended formula of Methyl Ketone and ground up ABS in some areas. I couldn't see much difference between the two, except the pipe cement is thicker. On the back side, I used heavier cloth, but it might not have been necessary. Just cut up a piece to cloth large enough to cover the crack or broken area, lay it in place, and dab a little pipe cement or dribble a little Meth onto the cloth to wet it, smooth it out, wearing rubber gloves, and then hold the pieces in position for a few seconds or a sometimes a minute, and then you are ready to paint it or fill it, depending on how fussy you are. The solvents evaporate quickly, and so if you don't use too much it dries quickly. But be careful not to stress your repair for 24 hrs. to allow it to acquire full strength. Get enough glue on it the first time, don't try to recoat a second time, a few minutes latter, because the second coat will dissolve the first coat, and it will take longer then to set up, and I doubt that the repair is made any stronger anyway. I had to make this kind of repair all over the trailer. But with the thin cloth, and sometimes a light coat of paint, the repairs are almost invisible. They are also as strong or stronger, than the original.

Here is another picture of how you get at the chain extrusion. The chains of course can usually be removed simply by lifting them straight out once they have been disconnected from the top, and there will probably be no need for most people to take the extrusion apart. But it was necessary for me to find that small piece of broken plastic in there that mucked up the works.


'74 Mesa Restoration
First of all, GREAT SITE. I am learning a lot of useful information to help me with my camper. I had just purchased an apache
camper from a friend of a friend.....anyway, I don't know what model it is and
I would like to find out. But the real reason I am writing to you is
because I am doing a -FULL- restoration on my apache. I started by
examining the entire thing. I decided to replace the wooden floor
because of questionable rotting. Keep in mind that my experience with
restorations on any old "thing" is detailed and worthwhile.
(dad and I have several cars that are in the process of being restored)
Anyway. During my restoration, I am taking pictures and noting some of
the unusual and difficult problems that I have/will encounter. So far, I
have sandblasted the frame, undercoated it, and replaced the wooden floor
covered in urethane-marble tile squares. Man, does it look sharp.
My girlfriend and her mother are helping me as much as they can.
Hopefully I can add to your website on a lot of the things I am doing to this
turkey. If needed, I will write up a step by step procedure on how to
replace the floor. With the help of a buddy or two, the job would have
been a lot faster and easier. No special tools needed, except for a floor
jack (or your two buddies). Thanks for lending an ear, I will keep you
updated on the restoration. Thanks a million. Truly yours, Dean "McGyver"
Bogner
I had to do a lot of repair on the ends of my Apache and found that Rustolium
Satin spray paint in the color "shell" was a very close match
for the original color. Also for the oxidized paint on the sides (and mine
was
really bad) use the product Nufinish (as seen on TV). You apply-let dry
for a minute and wipe off, and believe it or not it really works to restore the
color and shine. Hope this helps someone!
Denise - Kenduskeag, ME
Our 1975 Apache Roamer had been painted RED and then it was a poor paint job
to begin with (see attached pic). Time had faded it to an ugly shade.
WE painted it dark green. It looks much much better. I searched high and
low and did not find a 1.5 gal water heater replacement. We ended up
putting an in-line or tankless water heater in the camper. We paid about $155
for it (someone had special ordered it from Home Depot and then decided it
wasn't what they wanted. There are plenty of people out there who now think I am
crazy. They would not believe me when I told them I had a 1.5 gal water
heater in my 1975 Apache. The attached pics show the restoration along
with the water heater. My husband also installed a fuse box so that when we get
to the camp ground we only have to plug in one cord instead of 3 (the camper,
water heater and air conditioner). Sincerely,
Denise and Earl Matherne


I just saw your web site as I was looking for parts for my MESA. I enjoyed your story because I have had a similar experience. The first pop-up I traveled in was a canvas loaner from a neighbor when I was a kid. The next year my Dad bought an Apache Ramada which we used for about 6 years before they moved on to a Motor home. I really liked that camper and we traveled throughout Florida where we lived, the northeast and even the southwest over the years we owned it. I remember one of the first modifications he made was to install an air conditioner in the front panel on the tongue followed quickly by a rack connected to the slide outs which allowed us to carry canoes and even a 14 ft. fiberglass skiff.
Apache solid state campers are the best campers bar none. They were ahead of the rest and nothing has come since to challenge their status. They were quality built and one of the best engineered designs around. What I do not understand is why other companies haven't figured out the advantages the solid state campers have.
I bought my Mesa from my brother about 10 years ago. We used it for a few years and then following Hurricane Andrew we lent it to a former neighbor to use while their house was being repaired. The camper was set up and used for 14 months before it was returned to us. Needless to say, it bore the wear & tear of everyday use and constant exposure. Last year I began a massive rebuild because there is still nothing on the market that can touch it. The roof had a crack, the vent leaked water, the cushions were shot, the sink leaked, the inside wood panels had rotted from small water leaks, the windows were brittle and cracked. The end window panels were sagging and leaked as well.
About 11 months later, the camper almost looks like new. Unfortunately I was not able to keep the original theme in the drapes, etc. but it still looks great and renewed. All of the wood paneling (including the ceiling) was replaced with a lighter whitewashed finish which made the whole inside brighter. That included the ceiling, the inside ends, and all of the cabinet doors and faces (including the seating area). The ceiling crack was repaired by removing the top and fiberglassing the inside. When the top was replaced, it was reinsulated to keep the inside cool. A new ceiling fan unit replaced the old one and overhead lights were placed above the sink, above the table, and just above the entrance. The unit did have an air conditioner installed I decided that when I replaced that front end to reinforce the inside of the front shell with a fiberglass reinforced frame. When the A/C was replaced I used some boat molding around the edge of the fiberglass and then silicone caulk it to the A/C. I also had to replace the sink faucet and since the internal water tank was cracked, I cut it down so that it was just a tray to hold the hose and all electrical cords. All new external travel lights were installed. The bearings were removed, inspected, and repacked as well as replacing the bearing seals. The floor had quite a few nicks & cracks so we decided to put a new one on top of the old. While the frames & cabinets were out I cleaned the old floor with Acetone and used the best Armstrong's floor tiles I could find. They really made a difference...
John Hampp
